

How To Wrap React Website In A Native App
Co-ordinate to Statista, the number of smartphone subscriptions globally surpassed six billion, and it is expected to abound further past many millions in the coming few years. Without a 2nd idea, we tin say that developing an app for your business will accept it to its desired height.
This weblog is for you if you also desire to increase your concern achieve past developing a user-friendly app with the assistance of a professional React Native development visitor. Hither you will go the answer to your question- how to wrap React website in a Native app.
The affordable smartphones and easy availability of the internet have inverse the world. At present your potential customers don't need a desktop computer to scan your online shop.
Look at the number of smartphone users worldwide in the image below.
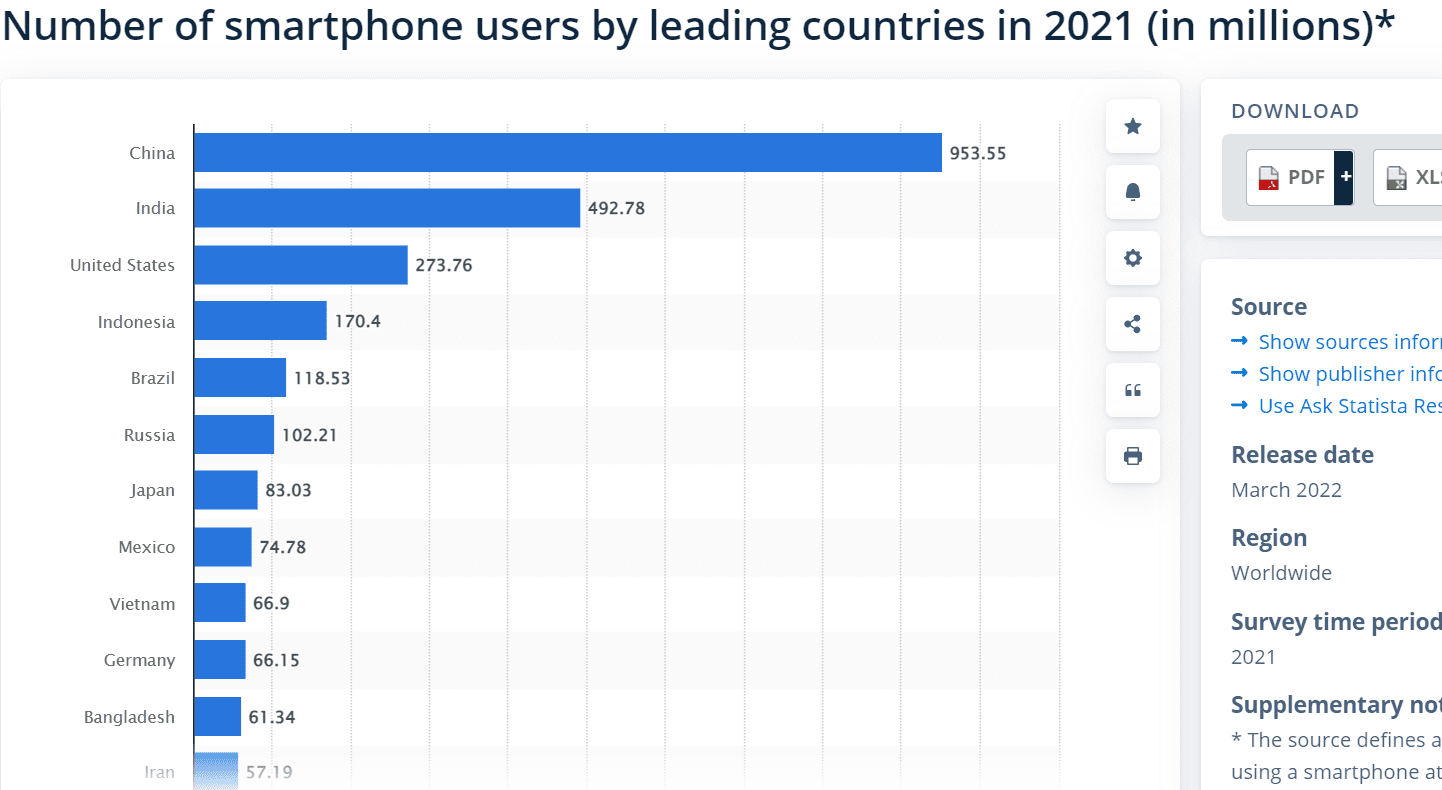
Epitome source
As per research, in 2022, mobile devices accounted for approximately half of the web traffic globally. At that place has been a pregnant increase in spider web traffic from mobile devices over the years. Check out the beneath graph.

Image source
Many businesses understand that their potential customers are available on mobile. Hence, they moved to mobile-friendly or responsive website design. No uncertainty, these responsive websites improve user interfaces. Only they are away from functionalities such as push notification, GPS, camera, offline access, etc., which tin be possible in mobile apps.
If you want to create a user-friendly mobile experience for your customers, rent React Native developers who tin convert your current website into iOS or Android apps. In this journey, our blog- how to convert React website into a native app, will prove a helping hand.
Simply before moving on to hash out how to convert React website into a native app, let's sympathise the benefits of converting your website into a mobile app.
Benefits of wrapping React website in a native app
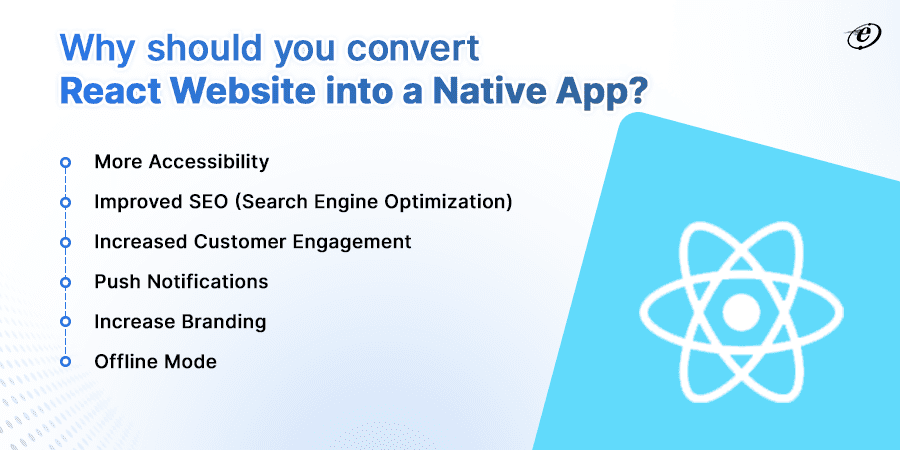
Mobile apps bring lots of benefits to your business, from increasing its branding to enhancing trust among customers. Let'southward cover some of the top benefits of converting React website in a native app.
-
More than Accessibility
Mobile apps increase accessibility by reducing the barriers between your online shop and customers. How? Let us explain it to y'all. Once the potential user installs an app, your production and services are but 1 click abroad from him. Users don't demand to call back the website address and open it in a split browser application. It is much easier to engage the user with an awarding. This awarding stays with the user till they desire it and keeps reminding them to shop again by giving some personalized discount messages
-
Improved SEO (Search Engine Optimization)
Co-ordinate to the latest research, smartphone users spend almost 83% of their time in apps. It is due to the piece of cake accessibility of applications on the home screen of users' phones.
As users search for each production through mobile merely, Google (search engine) as well privileges those websites with mobile apps. Considering Google displays results in SERP that are all-time suited for that interface. Hence Mobile apps are search engine friendly. Y'all can rank your website on the search engine Google by having an app.
-
Increased Customer Appointment
You lot can encourage customers to store over again through mobile apps by giving rewards or personalized discounts. Sympathise the scenario where a customer gets a message of an ongoing discount and a link with it to grab that discount. This link will divert the users to the app. Mobile apps are more user-friendly than websites, and then customers complete the purchase bike quickly and effectively. Thus, mobile apps are best for enhancing one-time customer date and encouraging new ones.
-
Push Notifications
The ability to send push notifications is 1 of the crucial benefits of mobile apps. Using it you tin can easily notify customers almost personal offers, new posts, and more without the need for opening or clicking on your app. The alerts announced on the locked or home screen of users if push button notifications are enabled. Hence users can see the message as they bank check their phones.
-
Increase Branding
Today, people spend more than time on mobile devices than on boob tube or desktop. Social media marketing is the biggest weapon to brand your product and services. You lot can run ads on social media platforms like Facebook and Instagram and drop the link to install your mobile apps. Once the app is installed, yous tin can target customers through push notifications and messages and motivate them to purchase the product and services.
-
Offline Manner
The best office of mobile apps is that they can also work offline. While websites ever need a proper cyberspace connection. Moreover, y'all tin can easily integrate offline features into the app. For instance, users can apply Google Docs without an cyberspace connection. Once the user is back online, the changes saved on the device are moved to the cloud.
Do these amazing benefits of mobile apps inspire you?

Allow's move on to discuss how to wrap React website in a native app.
How to wrap React website in a Native app?
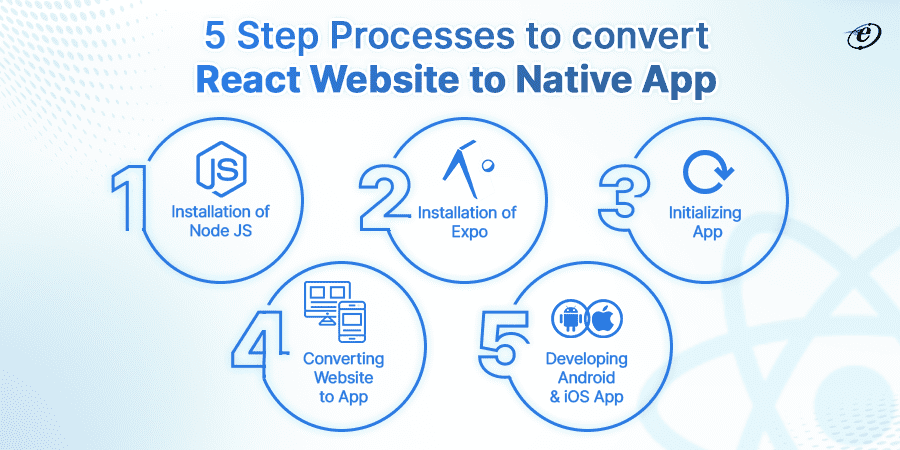
We have divided the whole procedure into simple steps. Information technology will be easier for you to sympathise. Without further delay permit'due south dive deeper into them
-
STEP ane: Installation of Node JS
Node JS is a cantankerous-platform and open-source JavaScript runtime environment. It is used for server-side rendering. Moreover, Node JS is mainly deployed for outcome-driven non–blocking servers, for example, dorsum-cease API services. This technology is congenital on Google Chrome'south V 8 JavaScript engine. Hence app evolution and maintenance are easier.
Go to the official website of Node JS – https://nodejs.org/en/, to download and install Node JS packages, including both npm and node.
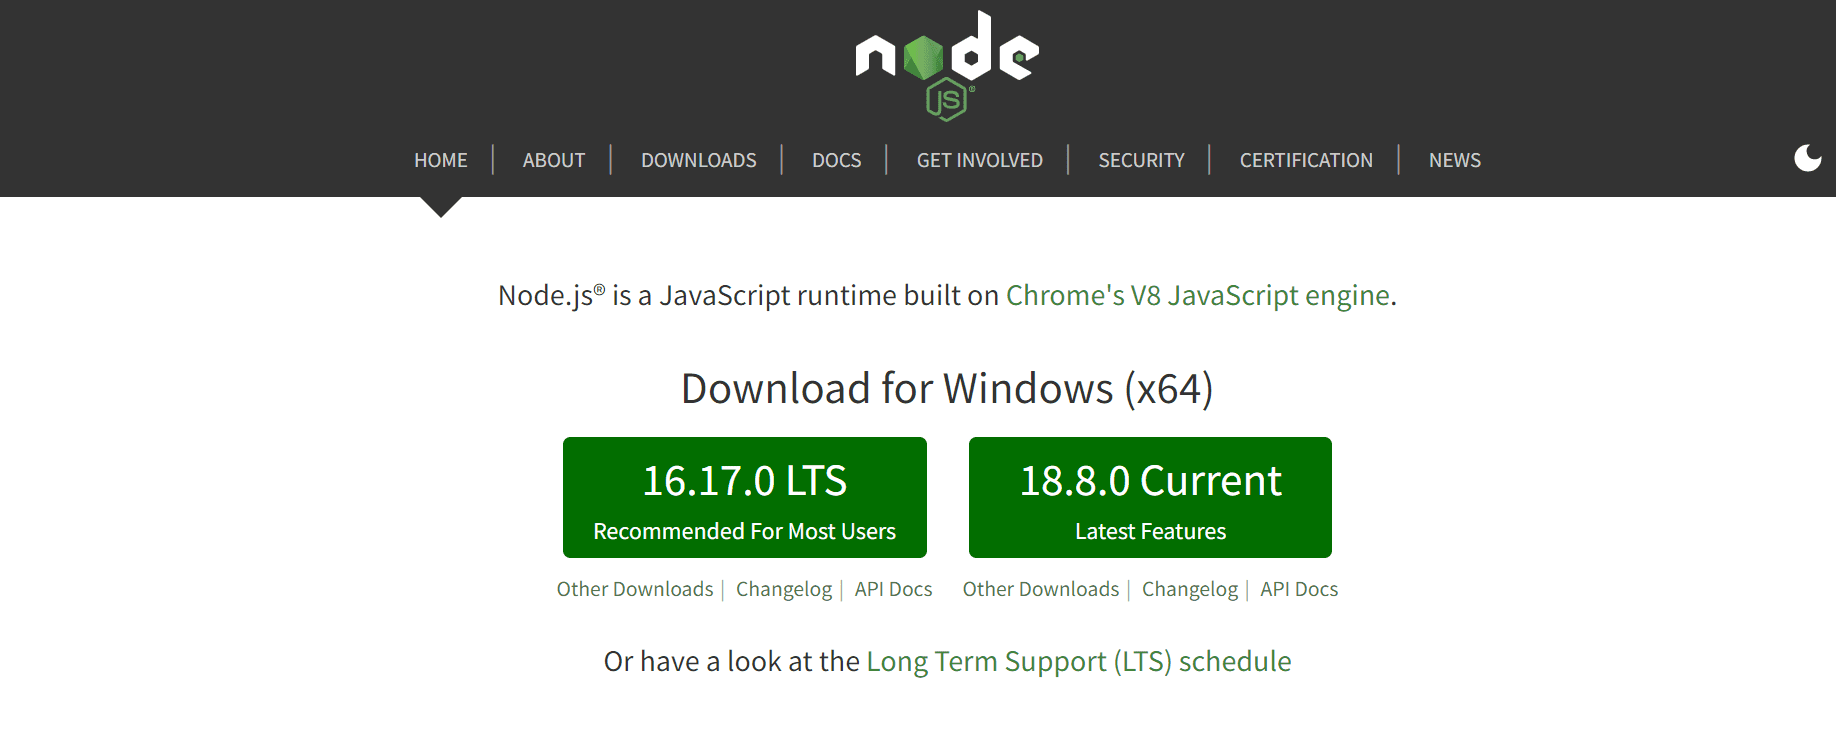
Image Source
-
Step 2: Installation of Expo
Let'southward empathise first what Expo is. Information technology is a universal React applications platform consisting of a set of tools and services. These services are centered around React Native and native platforms and assist developers to create, deploy, and iterate rapidly on Android and iOS from the same TypeScript/JavaScript codebase.
One time the Node JS is installed, run the below-given command to install Expo CLI
npm install –global expo-cli
At present create a new Expo project by running
expo init my-project
Now to test the application in development, run Expo starts in the Android emulator or iOS simulator. You can likewise exam it on your device by installing the Expo customer.
-
STEP three: Initializing App
Open up your terminal and write
expo init.
Information technology will then generate a simple ane-screen app using React Native.
After your app is created, navigate to your app folder using
cd your-app-name
Now execute the Expo start command
expo outset
* Expo CLI starts Metro Bundler when yous run expo start (or npm start). Metro Bundler is an HTTP server that compiles the JavaScript code of your mobile application with the help of Babel and serves information technology to the Expo app. Moreover, information technology pops up Expo Dev Tools, a graphical interface for Expo CLI.
On your phone, download and install the Expo Go app. Later installing on the "Projects" tab of the Expo Get app press "Scan QR Lawmaking" and and so scan the QR code you meet in the last or Expo Dev Tools.
-
STEP four: Converting Website to App
Open up your last and install React Native webview.
For that run this command
expo install react-native-webview
In one case it is installed open the folder of the app in any lawmaking editor similar VS code and app.js paste the given code and save it.
import * as React from "react";
import { WebView } from "react-native-webview";
export default class App extends React.Component {
render() {
return (
<WebView
source={{ uri: {your-website-link} }}
way={{ marginTop: 20 }}
/>
);
}
}
If the website overlaps the tiptop bar of the phone no need to worry. Considering luckily, React Native has a predefined component for IOS devices to display content in the safe area, in Android, we should do information technology manually.
import { Platform, SafeAreaView } from "react-native";
import Constants from "expo-constants";
export default part App(props) {
render <SafeAreaView
fashion={{
flex: 1,
backgroundColor: "#FFFFFF",
}}
>
<View
style={{
height: Platform.Bone === "android" ?Constants.statusBarHeight : 0,
backgroundColor: "#FFFFFF",
}}
></View>
<WebView source={{ uri: "https://expo.io/" }} />
</SafeAreaView>
}
At present let's empathise handling back country event and put some light on connectivity and loader.
Handling Back State Event
When we press the return button on an Android device, React Native will not alter the state of your website. Hence you have to add some logic to link the back issue with the back state on your website.
import {useEffect, useState, useRef} from "react";
import { Platform, BackHandler, SafeAreaView, View } from "react-native";
import { WebView } from "react-native-webview";
import Constants from "expo-constants";
export default office App(props) {
const WEBVIEW = useRef()
const [backButtonEnabled, setBackButtonEnabled] = useState(false)
// Webview navigation land alter listener
function onNavigationStateChange(navState) {
setBackButtonEnabled(navState.canGoBack)
};
useEffect(() => {
// Handle back issue
function backHandler() {
if (backButtonEnabled) {
WEBVIEW.electric current.goBack();
render true;
}
};
// Subscribe to dorsum land vent
BackHandler.addEventListener("hardwareBackPress", backHandler);
// Unsubscribe
return () => BackHandler.removeEventListener("hardwareBackPress", backHandler);
}, [backButtonEnabled])
return <SafeAreaView
style={{
flex: 1,
backgroundColor: "#FFFFFF",
}}
>
<View
style={{
height: Platform.OS === "android" ? Constants.statusBarHeight : 0,
backgroundColor: "#FFFFFF",
}}
></View>
<WebView
ref={WEBVIEW}
onNavigationStateChange={onNavigationStateChange}
source={{ uri: "https://www.chafikgharbi.com/" }}
/>
</SafeAreaView>
Connectivity & Loader
Now let'due south encounter how to bank check the connectivity and add a splash screen before the website loads.
Install netinfo package:
npm install –save @react-native-community/netinfo
Create a listener with react useEffect hook, if there is no net this will show "no connection" alarm, you lot can ignore this office if your website is PWA (supports offline)
const [isConnected, setConnected] = useState(true)
useEffect(() => {
// Subscribe for net state
const netInfroSubscribe = NetInfo.addEventListener((state) => {
setConnected(state.isConnected)
if (!country.isConnected) {
alert("No connection");
}
});
// Clean upwards
render netInfroSubscribe
}, [])
Y'all can cheque if your website is loaded using the onLoad property in webview.
const [loading, setLoading] = useState(true)
// Webview content loaded
function webViewLoaded() {
setLoading(fake)
};
<WebView onLoad={webViewLoaded}/>
And hither is the last lawmaking:
import React, { useEffect, useState, useRef } from "react";
import {
Platform,
BackHandler,
Dimensions,
SafeAreaView,
View,
Prototype,
} from "react-native";
import { WebView } from "react-native-webview";
import Constants from "expo-constants";
import NetInfo from "@react-native-community/netinfo";
const BACKGROUND_COLOR = "#FFFFFF";
const DEVICE_WIDTH = Dimensions.get("window").width;
const DEVICE_HEIGHT = Dimensions.get("window").top;
const ANDROID_BAR_HEIGHT = Platform.OS === "android" ? Constants.statusBarHeight : 0;
export default function App(props) {
const WEBVIEW = useRef()
const [loading, setLoading] = useState(truthful)
const [backButtonEnabled, setBackButtonEnabled] = useState(false)
const [isConnected, setConnected] = useState(true)
// Webview content loaded
function webViewLoaded() {
setLoading(false)
};
// Webview navigation state change
part onNavigationStateChange(navState) {
setBackButtonEnabled(navState.canGoBack)
};
useEffect(() => {
// Handle back event
function backHandler() {
if (backButtonEnabled) {
WEBVIEW.electric current.goBack();
return truthful;
}
};
// Subscribe to dorsum land vent
BackHandler.addEventListener("hardwareBackPress", backHandler);
// Unsubscribe
render () => BackHandler.removeEventListener("hardwareBackPress", backHandler);
}, [backButtonEnabled])
useEffect(() => {
// Subscribe for net state
const netInfroSubscribe = NetInfo.addEventListener((state) => {
setConnected(country.isConnected)
if (!state.isConnected) {
alert("No connection");
}
});
// Make clean upwardly
return netInfroSubscribe
}, [])
return (
<SafeAreaView
style={{
flex: 1,
backgroundColor: BACKGROUND_COLOR,
}}
>
<View
style={{
height: ANDROID_BAR_HEIGHT,
backgroundColor: BACKGROUND_COLOR,
}}
></View>
{(loading || !isConnected) && (
<View
style={{
backgroundColor: BACKGROUND_COLOR,
position: "absolute",
top: 0,
left: 0,
zIndex: 10,
width: DEVICE_WIDTH,
height: DEVICE_HEIGHT + ANDROID_BAR_HEIGHT,
flex: one,
alignItems: "center",
justifyContent: "center",
}}
>
<Image source={require("./assets/icon.png")}></Image>
</View>
)}
{isConnected && (
<WebView
onLoad={webViewLoaded}
ref={WEBVIEW}
useWebKit={true}
onNavigationStateChange={onNavigationStateChange}
source={{ uri: "https://expo.io/" }}
/>
)}
</SafeAreaView>
);
}
-
STEP v: Developing Android & iOS App
You have to write the beneath command in your concluding to create an Android & iOS app.
Android : expo build:android
iOS : expo build:ios
You can see the app in your expo dashboard at expo.io
Read more: How to hire React Native developers for your next project.
Last Words
We hope this guide will prove helpful to y'all. Now yous are able to respond the question-how to wrap React website in a native app. If you lot are still left with any dubiety, feel free to connect with our React Native developers, who have v+ years of experience in developing web and mobile applications of all scales.
Source: https://eluminoustechnologies.com/blog/how-to-wrap-react-website-in-native-app/
0 Response to "How To Wrap React Website In A Native App"
Post a Comment